Devon gave me new ideas about gearing. I had always been happy with the gear range on my Galaxy, throughout its life as a commuter, shopper and general workhorse, and for some time after I swapped commuting for touring. Like most other aspects of my bike, I didn't know too much about the gears and felt Dawes had made a reasonable choice on my behalf.
The 20% and above hills in the deepest depths of the South West caused me to think again. Chugging up 1:5 gradients with a full touring load, I was frequently running out of low gears and having to get off and push.
The Dawes Galaxy comes with a front chainset of 48/36/26 and 11-32 at the back, giving me a low gear of 21.9in. I noticed a few other touring cyclists mentioning lower gears, and wondered whether my setup was unusually high. A surprisingly controversial discussion on the CTC touring forum only concluded that everybody was different and, while some people had benefited hugely from lower gears, others were fine with much higher ranges. It just had to be tried really.
Chainrings
I learned a lot about cranks and chainrings through this process. When buying new chainrings for existing cranks, there are two things to consider:
1. the number of bolts around the crank spider
2. the bolt circle diameter (BCD).
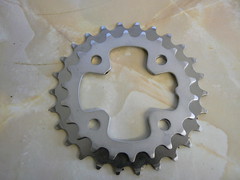 These dictate which chainrings will fit the cranks, and therefore what choices you have in terms of numbers of teeth. With a triple chainset there are two sets of bolts, one for the inner chainring and one for the middle and outer, and thus two different BCDs. My inner BCD is 64mm, and the minimum number of teeth available is 22, which would reduce my lowest gear by 3 inches. However, this would be a huge drop down from the middle ring's 36t so I decided to order a 32t middle ring to even out the spacing a little. It was still possible that 32 to 48 would be too big a gap and I might want to change the outer for a 44, but since bigger chainrings cost more I decided to wait and see about that.
My chainrings arrived and, utterly clueless as to how these things are done, I dived blindly out to the back yard, armed with various Allen keys and spanners.
You can just push the chain aside (some consider it a good idea to put it on the outer ring to protect your hands from the teeth) but I decided to remove it to get it right out of the way, and to give it a clean. Technically you are supposed to install a new chain when you replace chainrings, to minimize wear on everything, but for the same reasons you are also supposed to replace the cassette when you get a new chain... I'm not keen on the whole idea of discarding perfectly good stuff just because it's a little worn, so decided to leave that one alone for the moment.
I removed the outer chainring bolts with a 5mm allen key. They were quite stiff, having been undisturbed for about five years, but gave eventually and the outer chainring slid off over the crank. Only the outer ring can be removed in this manner, and the inner two cannot be taken off without removing the right crank.
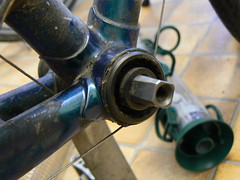
Removing the crank
I removed the dust cap, underneath which was a 14mm bolt requiring a socket wrench. This was even harder to remove than the chainring bolts, and it didn't help that I could only find a socket wrench with a couple of inches leverage. I've had this bike for five years, ridden it thousands of miles and this was the first time I've worked on this part of it. No wonder things were a bit stiff.
I was naively hoping everything would come apart once the bolt was out, but after that I faced with a square hole embedded deep within the crank, and no amount of pulling would get the crank off. At this point, the sun was on its way out for the evening, my fingers were freezing cold and I got distracted for a while trying to photograph the fat robin that had taken a shy interest in the complete cock-up I was making of my bike mechanics, well it was either that or the robin-muesli I had scattered for him.
I retired to the warmth of the house to research the matter further, upon which I learned I would need a crank puller in order to remove the crank.
Crank puller
My crank puller showed up a couple of days later. It was a very cold day so I kicked dgym's trike out of the shed to make some work space.
I wasn't sure at first that I'd got the right tool, the thin round bit didn't look as if it would fit into the even thinner square hole in the crank. A little online research reassured me that it wasn't supposed to, rather it pushes against that bit while the wider bolt pulls the crank away.
I removed the tool's outer bolt from inner, and screwed it as far as I could into crank, into the threads the dust cap had been covering. I then inserted inner bolt and screwed it in as far as I could. This evidently wasn't far enough as the crank didn't come off. I pushed and pushed, but nothing was happening. At this point, the bike had to come down off the workstand, as it couldn't stand up under this kind of force. I put my whole bodyweight onto it, leaning the bike against the workbench, one foot on the pedal, the other on the crank puller handle, keeping stability by leaning into the bench, and it finally gave way.
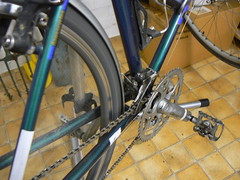
 Finally, my crank was free. I removed the inner and middle chainrings, the inner chainring bolts requiring more force than the outer ones had (perhaps I was not feeling so strong that day?) and gave everything a good wash.
I fitted the new rings, the notches facing the crank. It didn't matter this time due to the tiny diameter of the inner ring, but on some setups the outer chainring nuts need to go in before the inner chainring is screwed in place. I greased the chainring and crank bolts before putting them in, but did not grease the axle as this can result in the crank going on too far and damaging the axle.
While I was at it, I gave the chain and rear mechs a thorough clean too, and put the chain back in place.
 It was only when it came to turning the pedals and testing out the whole system that I noticed the rotation was somewhat uneven - puzzled as to what I'd done wrong, I eventually noticed I'd reinstalled the right crank at 90 degrees to the left one. Doh! It was much easier to remove the crank the second time round, and I set the crank correctly.
After some testing and tweaking of the system, I became slightly concerned that I wasn't able to get a good derailleur setup - the shifting seemed slightly awkward, having to overshoot to shift up, and then move the derailleur back to avoid chain rub. More research told me that derailleurs have a capacity, the difference between inner and outer teeth, and mine was most likely 22t - with a range of 26t I was now exceeding my capacity. This is not necessarily a problem, the capacities are normally set fairly conservatively and if the gearing system is not abused, i.e. smallest with smallest, I should be able to get away with it.
However, I eventually decided that on a touring bike it is always better to have the most standard and common setup you can - so 44/32/22 would make sense. I wasn't desperate to hang onto the 48t. Realising that my almost unused mountainbike had an almost new 44t chainring, it was easy and free to give it a try.
After much faffing around with both front and rear derailleur adjustment (during which I managed to snap my rear gear cable) I finally got things shifting reasonably well.
Chain
On my first trip into town, the chain snapped dramatically outside the supermarket. The break occurred a couple of links away from the Powerlink, and I managed to find a small fragment with one half of the powerlink but couldn't find the other. I freewheeled / pushed down the road to the bikeshop, which unfortunately was closed due to Christmas holidays. I went back and had one final hunt for the other bit of the powerlink, but no such luck.
Fortunately I had a chain tool on me so propped the bike up against the wall and knelt down to rejoin my chain. It would be a few links short but with careful pedalling and shifting, should get me home, which was only a mile or two away. Joining a chain is quite a fiddly task, especially when you have less chain to work with than you should. Since I normally use Powerlinks I'm not that experienced with the chain tool so it took a while, especially the final join, trying to keep the chain correctly routed and push the jockey wheels in to give me as much slack as possible (I eventually tied them to a spoke with a spare leg band). A couple of folk approached me while I was kneeling in the street, agonizing, swearing and bleeding (I must have snagged a knuckle on on of the teeth). One chap just wanted to check that I was OK and had everything I needed to fix it. The other advised me that braided fuse wire was useful as an emergency chain fix. Sounds like a good candidate for the generic repair kit.
I eventually got the hang of it. When joining, rather than just slipping the inner plates between the outer plates and trying to hold it all together whilst pushing in the rivet, it is much easier to push the rivet in by about a millimetre, part the outer plates slightly so that the inner can be pushed in and latch onto that millimetre of rivet - then use the tool and it'll stay in place.
It got me home, but I needed a new chain now that the old one had lost links. I learned how to check for chain stretch, measured the old chain and found that it would have needed replacing anyway before it started to damage the cassette. On visual examination of the cassette, it doesn't seem worn enough to warrant a replacement. If the chain slips a lot, I will take that as advice that I am wrong.
Conclusion
With the new chain installed and adjusted, things started to get better. I think that the new gears are an improvement, and I seem to be making more even use of the outer and inner rings, although living in the gentle valleys of North Dorset, I have yet to try it out on any really steep hills. It feels like I have made the right choice in reducing my gears, but time and touring will tell.
No comments:
Post a Comment